TL;DR
This is an extensive post so if you just wish to use the react component - download the repository. After that navigate to the root folder and execute npm run build. You can use this post as a companion to understand the code.
Table of contents
Preface: I couldn't find an official react implementation of typeahead.js, so I decided to do it myself. The official typeahead.js github repository seems to be abandoned and the support discontinued.
I also couldn't get the typings for typeahead.js to work (see my question on StackOverflow) so I was forced to use declare const $: any; and declare const Bloodhound: any;. If you don't have any idea what I'm talking about - don't worry.
What are we building?
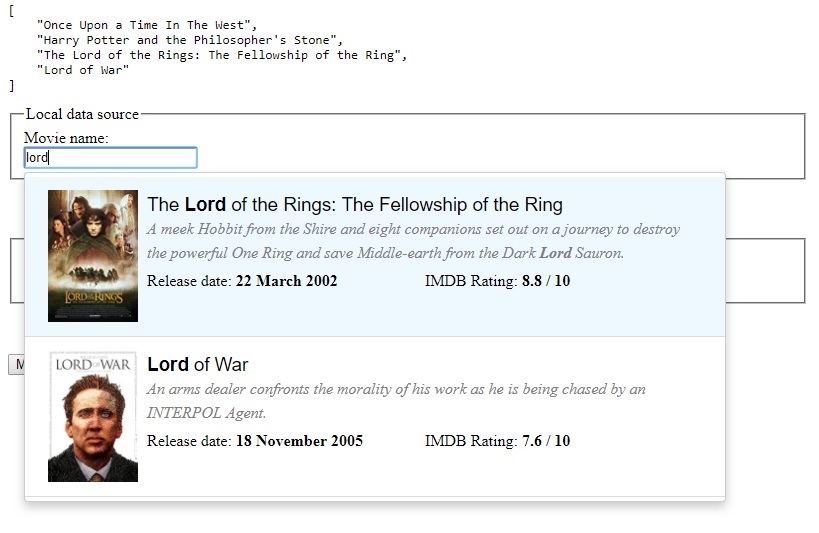
We are going to create our own typeahead.js react wrapper. In this example we're implementing an autocomplete text input for suggesting movie titles, with the option of using either local or a remote data source. Check out the source code at GitHub
1. package.json
First, we're going to setup our project for development. We are using TypeScript for typings and Webpack for bundling and compiling our .ts and .tsx files into js.
Steps:
- Create a new project in your favorite IDE
- Open a terminal
- Run npm init -y
- Run npm install typescript awesome-typescript-loader webpack webpack-cli --save-dev
- Run npm install react react-dom @types/react @types/react-dom --save
- Add "watch": "node_modules/.bin/webpack --watch" to the scripts section of package.json this will give us the convenience of typing npm run watch and have our bundles checked and compiled on save
Your package.json file should look like this:
{
    "name": "react-typeahead",
    "version": "1.0.0",
    "description": "",
    "main": "index.js",
    "scripts": {
        "watch": "node_modules/.bin/webpack --watch",
        "build": "node_modules/.bin/webpack"
    },
    "keywords": [],
    "author": "",
    "license": "ISC",
    "devDependencies": {
        "awesome-typescript-loader": "^5.2.1",
        "typescript": "^3.5.3",
        "webpack": "^4.35.3",
        "webpack-cli": "^3.3.5"
    },
    "dependencies": {
        "@types/react": "^16.8.23",
        "@types/react-dom": "^16.8.4",
        "react": "^16.8.6",
        "react-dom": "^16.8.6"
    }
}
2. tsconfig.json
Create a tsconfig.json file with the following contents:
{
    "compilerOptions": {
        "moduleResolution": "node",
        "noImplicitAny": false,
        "noEmitOnError": true,
        "module": "esnext",
        "removeComments": false,
        "sourceMap": false,
        "target": "es5",
        "jsx": "react",
        "noEmit": true,
        "importHelpers": true,
        "lib": ["dom", "es2015"]
    },
    "exclude": [
        "node_modules"
    ]
}
3. webpack.config.json
Create a webpack.config.json file with the following contents:
"use strict";

var path = require("path");

module.exports = {
    mode: "development",
    entry: {
        "app": "./src/App.tsx",
    },
    output: {
        publicPath: "/build/js/",
        path: path.resolve(__dirname, 'build/js'),
        filename: "[name].bundle.js"
    },
    module: {
        rules: [
            {
                test: /\.(ts|tsx)?$/,
                use: "awesome-typescript-loader",
                exclude: /node_modules/
            }
        ]
    },
    resolve: {
        extensions: [".js", ".jsx", ".ts", ".tsx"]
    }
};
4. jQuery and typeahead.js
Great, we have all our configuration files set up.
Now we need to get typeahead.js into our project. Go to the typeahead.js repo and download it from there. Or if you wish you can copy it from the GitHub repo of this tutorial here.
Next we are going to reference jQuery the manual way. Why not install it via npm? Because we don't have typings for typeahead.js and typeahead is a jQuery plug-in, so we won't be able to compile it if we have strict jQuery typings.
I'm using jquery-3.3.1.min.js. You can download it from here.
Create a lib folder and put those in there.
Your project should have the following structure:
/project
    │── /node_modules
    │── /lib
        │── /jquery/
        │   └── jquery-3.1.1.min.js
        └── /typeahead/
            │── typeahead.min.css
            └── typeahead.bundle.min.js
    │── package.json
    │── tsconfig.json
    └── webpack.config.json
5. Add App.tsx
In our webpack.config.json file we can see that our entry is set to App.tsx. So, we're going to add this next.
import * as React from 'react';
import * as ReactDOM from 'react-dom';

ReactDOM.render(
    <h1>Hello</h1>,
    document.getElementById("root")
);
Create a new folder called src and add a new App.tsx file. Open a terminal in your project directory and execute npm run build. You should see the compiled javascript under /build/js
6. Add index.html
At the root of your project directory create a new file called index.html. We are going to reference our modules in it and use it for development. Add the following contents:
<!DOCTYPE html>
<html lang="en">
    <head>
        <meta charset="UTF-8">
        <meta name="viewport" content="width=device-width, initial-scale=1.0">
        <meta http-equiv="X-UA-Compatible" content="ie=edge">
        <link rel="stylesheet" href="./lib/typeahead/typeahead.min.css"/>
        <title>react-typeahead</title>

        <style>
            .tt-menu {
                width: 700px;
            }
        </style>
    </head>
    <body>
        <div id="root"></div>

        <script src="./lib/jquery/jquery-3.3.1.min.js"></script>
        <script src="./lib/typeahead/typeahead.bundle.min.js"></script>
        <script src="./build/js/app.bundle.js"></script>
    </body>
</html>
If you open this page in the browser you should see that it says "Hello". If you don't - you should execute npm run build in the terminal in order to compile the files and generate the bundle.
7. Starting development
Next up we're going to define some typeahead specific properties. Create a new file Interfaces.Typeahead.ts And add the following contents:
interface ITemplatesProps {
    suggestion: Function
}

interface IClassNamesProps {
    input?: string,
    menu?: string,
    hint?: string,
    dataset?: string,
    suggestion?: string,
    empty?: string,
    open?: string,
    cursor?: string,
    highlight?: string;
}

interface IDataSetProps {
    source: Function,
    display: Function,
    templates: ITemplatesProps,
    limit?: number;
}

export interface ITypeaheadProps {
    placeholder?: string,
    highlight?: boolean,
    hint?: boolean,
    minLength?: number,
    classNames?: IClassNamesProps,
    searchField: string,
    dataset: IDataSetProps;
}
Now we are going into the main component of this blog post. We are going to create a file named Typeahead.Base.tsx which is going to be our base for further typeahead wrapper implementations.
!code goes here!
Code explanation
Our base typeahead component is stateless but it needs lifecycle hooks and refs, so it extends React.PureComponent And since we're using an external dependency (typeahead) we need to use refs so we can properly initialize our typeahead instance. In this case we're going to pass in a callback to the ref attribute. This ensures that the DOMElement is actually there when we need it.
Now typeahead works with data sources, so we are going to add this next. At the beginning I mentioned that our input is going to suggest movies based on movie titles. This means that we need to create our movies data source:
MockMovieDb.ts
const MockDB = [
{
    id: 1,
    title: "Once Upon a Time In The West",
    description: "The film portrays two conflicts that take place around Flagstone, a fictional town in the American Old West: a land battle related to construction of a railroad, and a mission of vengeance against a cold-blooded killer.",
    rating: 8.5,
    imageUrl: "./img/once-upon.jpg",
    releaseDate: "21 December 1968"
},
{
    id: 2,
    title: "Harry Potter and the Philosopher's Stone",
    description: "An orphaned boy enrolls in a school of wizardry, where he learns the truth about himself, his family and the terrible evil that haunts the magical world.",
    rating: 7.6,
    imageUrl: "./img/harry-potter.jpg",
    releaseDate: "15 February 2002"
},
{
    id: 3,
    title: "The Lord of the Rings: The Fellowship of the Ring",
    description: "A meek Hobbit from the Shire and eight companions set out on a journey to destroy the powerful One Ring and save Middle-earth from the Dark Lord Sauron.",
    rating: 8.8,
    imageUrl: "./img/lotr.jpg",
    releaseDate: "22 March 2002"
},
{
    id: 4,
    title: "Lord of War",
    description: "An arms dealer confronts the morality of his work as he is being chased by an INTERPOL Agent.",
    rating: 7.6,
    imageUrl: "./img/low.jpg",
    releaseDate: "18 November 2005"
}];

export default MockDB;
However this is the barebones of our data source. What we need now is something that typeahead can work with. Add the following:
MoviesDataProvider.Local.ts
import MockDB from "./MockMovieDb";
import IMovie from './IMovie';

declare const Bloodhound: any;

export default class MoviesDataProviderLocal{
    private readonly data: IMovie[];

    constructor() {
        super();
        this.data = MockDB;
    }

    get DataSource(): Function {
        return () => {
            var engine = new Bloodhound({
                datumTokenizer: Bloodhound.tokenizers.obj.whitespace("title"),
                queryTokenizer: Bloodhound.tokenizers.whitespace,
                identify(obj) { return obj["title"]; },
                local: this.data
            });

            function suggestionsWithDefaults(q, sync) {
                if (q === "") {
                    sync(engine.index.all());
                }
                else {
                    engine.search(q, sync);
                }
            }

            return suggestionsWithDefaults;
        }
    }
}
Now we are getting an error that says we don't have an IMovie.ts module. So, we need to add that next:
IMovie.ts
export default interface IMovie {
    id: number,
    title: string,
    imageUrl: string,
    rating: number,
    description: string,
    releaseDate: string
}
Here we just define the type of our Movie entity that we're going to work with throughout the remaining part of the tutorial. We are going to use the title property as a search field. The rest of these properties are used just so we can demonstrate the flexibility we get for displaying the dropdown list with results.
Now it's time for us to 'inherit' that base typeahead component we created earlier. I'm saying 'inherit' here because we're just going to create a new wrapper component around TypeaheadBase so we can have cleaner and tidier code.
Typeahead.MovieSuggestions.tsx
import * as React from 'react';
import { renderToString } from 'react-dom/server';
import TypeaheadBase from './Typeahead.Base';
import SuggestionTemplate from './SuggestionTemplate';
import MoviesDataProviderLocal from './MoviesDataProvider.Local';

export interface ITypeaheadMovieSuggestionsProps {
    name: string,
    text: string,
    onChange: Function,
    dataProvider: MoviesDataProviderLocal
}

export default class TypeaheadMovieSuggestions extends
    React.Component<ITypeaheadMovieSuggestionsProps, {}> {

    constructor(props){
        super(props);
    }

    render = () => {
        return (
            <TypeaheadBase
                name={this.props.name}
                text={this.props.text}
                onChange={this.props.onChange}
                typeahead={{
                    minLength: 3,
                    highlight: true,
                    searchField: "title",
                    classNames: {
                        menu: `tt-menu`
                    },
                    dataset: {
                        source: this.props.dataProvider.DataSource,
                        display: (arg) => {
                            return arg.title;
                        },
                        templates: {
                            suggestion: (arg) => {
                                const html = renderToString(
                                    <SuggestionTemplate data={arg}/>
                                );

                                return html;
                            }
                        },
                        limit: 100
                    }
                }}
            />
        );
    }
}
Our TypeaheadMovieSuggestions component is going to be a controlled component - accepts onChange callback as one of its props so we can consume it as a controlled component. We haven't really made really granular props for customizing the component, however you could add whatever options you wish and abstract it even further.
Now let's create our mock form component where we are going to consume our movie suggestions input.
MockForm.tsx
import * as React from 'react';
import TypeaheadMovieSuggestions from './Typeahead.MovieSuggestions';
import MoviesDataProviderLocal from './MoviesDataProvider.Local';

interface IMockFormState {
    selectedMovie: string
}

export default class MockForm extends React.Component<{}, IMockFormState> {
    constructor(props){
        super(props);

        this.state = {
            selectedMovie: ""
        };
    }

    private readonly handleValueChange = ({target}): void => {
        this.setState({
            selectedMovie: target.value.title
        });
    };

    private readonly handleOnSubmitClick = (): void => {
        alert(`You've selected ${this.state.selectedMovie}`);
    };

    render = () => {
        return (
            <form style={{width: "800px"}}>
                <fieldset style={{marginBottom: "50px"}}>
                    <legend>Local data source</legend>
                    <label htmlFor="selectedMovieLocal">Movie name:</label>
                    <TypeaheadMovieSuggestions
                        name={"selectedMovieLocal"}
                        text={this.state.selectedMovie}
                        onChange={this.handleValueChange}
                        dataProvider={new MoviesDataProviderLocal()}
                    />
                </fieldset>

                <input
                    type="button"
                    value="Mock Submit"
                    disabled={this.state.selectedMovie === ""}
                    onClick={this.handleOnSubmitClick}
                />
            </form>
        )
    }
}
Modify App.tsx so it renders our MockForm instead of an h1 tag:
import * as React from 'react';
import * as ReactDOM from 'react-dom';
import MockForm from './MockForm';

ReactDOM.render(
    <MockForm />,
    document.getElementById("root")
);
Run npm run build to compile the files and browse index.html directly from your file system.
Some of the files we created in this tutorial are different than their counterparts in the github repository; other files are simply omitted for convenience.